| Timeline Editor |
|
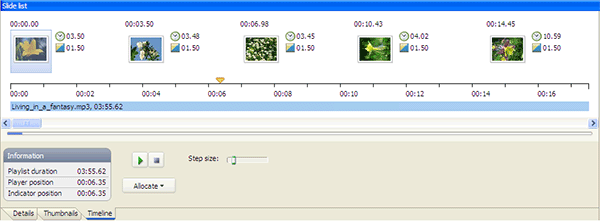
The Timeline Editor is available in MySlideShow Gold. You can open the Timeline Editor panel of the Slide List using the Timeline tab below the list.
The Timeline window displays the slide thumbnails with the slide position
above the thumbnail and the slide and transition durations at the right. At the
end of the slide thumbnails, the program displays the show duration vertical
line. You can move the line by the mouse to change the show duration (it will
actually change the duration of the last slide).
Slide allocation
The Allocate button's menu contains several options that allows you to allocate the slides on the timeline. The most popular option is Allocate | Slides on Playlist Timeline. When you use it, MySlideShow will allocate all your slides on the timeline of the Sync Playlist with equal intervals. Allocate | Slides on Item Timeline just does the slide durations equal not changing the show duration.
Slide selection
- To select a slide, click on it.
- To select consecutive slides, click the first item, press and hold down SHIFT, and then click the last item.
- To select nonconsecutive slides, press and hold down CTRL, and then click each item.
Playing tracks
You can use the player buttons to play/stop audio tracks of the Sync Playlist. The
![]() indicator displays the current
playlist position.
indicator displays the current
playlist position.
- To play an audio track at a specific point, drag the indicator.
- To move the indicator to a specific point on the timeline, double-click there.
- To quickly scroll the window to the place where the indicator visible in the center of the window, press C.
- To move a selected slide to the indicator position, press Enter.

Timeline selection
- To select a part of the timeline, click on the start position and move the mouse pointer to the end position.
- To select a part of the timeline that corresponds to an audio track, double-click on the track.
- To clear the selection, click on the timeline.
This allows you to select a group of slides and a part of the timeline and then use the Allocate | Selected Slides on Timeline Selection option. For example, you can allocate the first 10 slides on the first track and the second 10 slides on the second track.
![]() Note
Note
- To change the duration of a slide or a group of slides, select the slide(s), open the Slide Settings window | Slide tab and change the value after at the right of the Automatically After option.
- To push the selected slide and its next slides forward or pull them back, move the selected slide holding ALT. This actually does the same as changing the duration of the slide previous to the selected one.
Keyboard shortcuts
To process keyboard shortcuts, the Timeline view must be focused (click on the control to place the focus there). The following table lists the available keyboard shortcuts:
| CTRL+P, SPACE | Play/Pause |
| CTRL+S | Stop |
| C | Scroll the window to the indicator position |
| ENTER, M | Move a selected slide to the indicator position |
| UP/LEFT ARROW | Scroll back |
| DOWN/RIGHT ARROW | Scroll forward |
| CTRL+UP/LEFT ARROW | Move selected slides back |
| CTRL+DOWN/RIGHT ARROW | Move selected slides forward |
| SHIFT+UP/LEFT ARROW | Move the indicator back |
| SHIFT+DOWN/RIGHT ARROW | Move the indicator forward |
| TAB/SHIFT+TAB | Focus the next/previous slide |